How To Make A Felt Moroccan Pouffe
A felt Moroccan Pouffe with felt details is a true masterpiece of craftsmanship and design. Combining the rich and exotic aesthetics of Moroccan decor with the cozy charm of felt, this pouffe is more than just a piece of furniture; it's a work of art. Handcrafted by skilled artisans, it features intricate felt patterns meticulously stitched onto the pouffe's supple leather or fabric exterior.
The result is a stunning fusion of textures and colors, adding depth and character to any room. Besides its undeniable visual appeal, this pouffe offers a comfortable and versatile seating or footrest option. Whether placed in a living room for extra seating, a bedroom as a plush accent, or a cozy corner for relaxation, the felt Moroccan Pouffe with felt details effortlessly infuses your space with both exotic elegance and inviting comfort, creating a focal point that will have your guests in awe.
Materials You'll Need To Make A Moroccan Pouffe
- One pouffe with a 60cm (23 1/2in) diameter
- Two 50cm (20in) squares of woven felt in red
- One 50cm (20in) square of lightweight iron-on fabric
- Small gold seed beads
- 110cm (43 1/8in) of gold cord
- 75cm (29 1/2in) of gold lace braid
- Sewing thread matching the pouffe color
- Sewing thread matching the red felt
- Sewing needle and beading needle
- Large-headed pins
- Fabric glue
- Soft (2B) pencil
- 50cm (20in) square sheet of tracing paper
- Bristol board
- Fine-tipped black felt-tip pen
- White gel pen
- Flat metal ruler (at least 60cm/23 1/2in in length)
- Rotary cutter
- Cutting mat
- Paper scissors and embroidery scissors
- Iron
Start Making Your Felt Moroccan Pouffe
Step 1: Create the Motif
Enlarge the central motif by the amount you like. Iron the square of iron-on fabric onto the reverse side of one of the red felt squares using a hot iron. Pin the tracing paper onto the iron-on fabric at the corners. Trace the motif's outline with a soft pencil. If the outline isn't clear, turn the tracing paper over and repeat. Remove the tracing paper and trace the motif with a black felt-tip pen. Ensure the outline is clear, and then carefully cut out the motif using embroidery scissors.
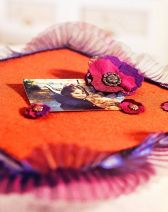
Step 2: Glue on the Motif to The Felt Moroccan Pouffe
Pin the motif in the center of the felt Moroccan pouffe, using vertical pins inserted halfway to secure it. Lift a section of the felt and apply glue to the reverse side. Press down while removing the pins one by one. Leave the pins in place on the unstuck parts until you've glued the entire motif.
Continue Making The Felt Moroccan Pouffe
Step 3: Make the Tassels
Cut 12 rectangles measuring 12 X 12.5cm (4 3/4 x 4 7/8in) from the second red felt square. Draw a horizontal line 2cm (3/4in) from the top of each rectangle's reverse side using a black felt-tip pen. Place a rectangle right side down on a cutting mat and cut fringes every 2mm (1/8in) using a rotary cutter and metal ruler, ensuring not to cut above the black line. You can use scissors, but the fringes won't be as even.
Apply glue to the 2cm (3/4in) strip at the top which hasn't been cut. Cut a 9cm (3 1/2in) length of gold cord, fold it in half to form a loop, and place the ends on the glue 1cm (in) from the right edge. Add a little glue and roll the tassel up. Hold it for five minutes to set. Cut a 6cm (2 3/8in) length of gold lace braid.
Wrap it around the top of the tassel and secure it at the back with a few stitches using red thread.
Lay the tassel on a table and select eight of the most visible fringes. Sew small gold beads all the way down four of the strips (every other strip) using a beading needle and red thread - about 17 beads per strip.
Step 4: Create the Small Motifs For The Felt Moroccan Pouffe
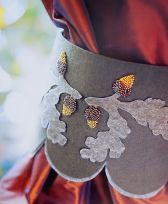
Trace the small motif onto Bristol board and cut it out. Copy the outline twelve times on the reverse side of the red felt, then cut out the motifs using embroidery scissors. Position the cut-out motifs around the central motif on the pouffe, aligning the flat edge with the piping as if placing numbers on a clock face. Find the exact center of the pouffe with a ruler and insert a pin. Place your first piece at 12 o'clock and the second at 6 o'clock, securing them with vertical pins halfway in. Continue placing the motifs following this pattern.
To attach the shapes, lift them without removing the pins and apply a little glue to one area on the back. After two minutes, pull out the pin and apply glue to the rest of the motif. Once you've finished attaching the motifs, sew a tassel between each motif to hang down the side. Use a small stitch to attach the tassel's gold cord to the pouffe's piping, using thread that matches the felt Moroccan pouffe's color.


.jpg)