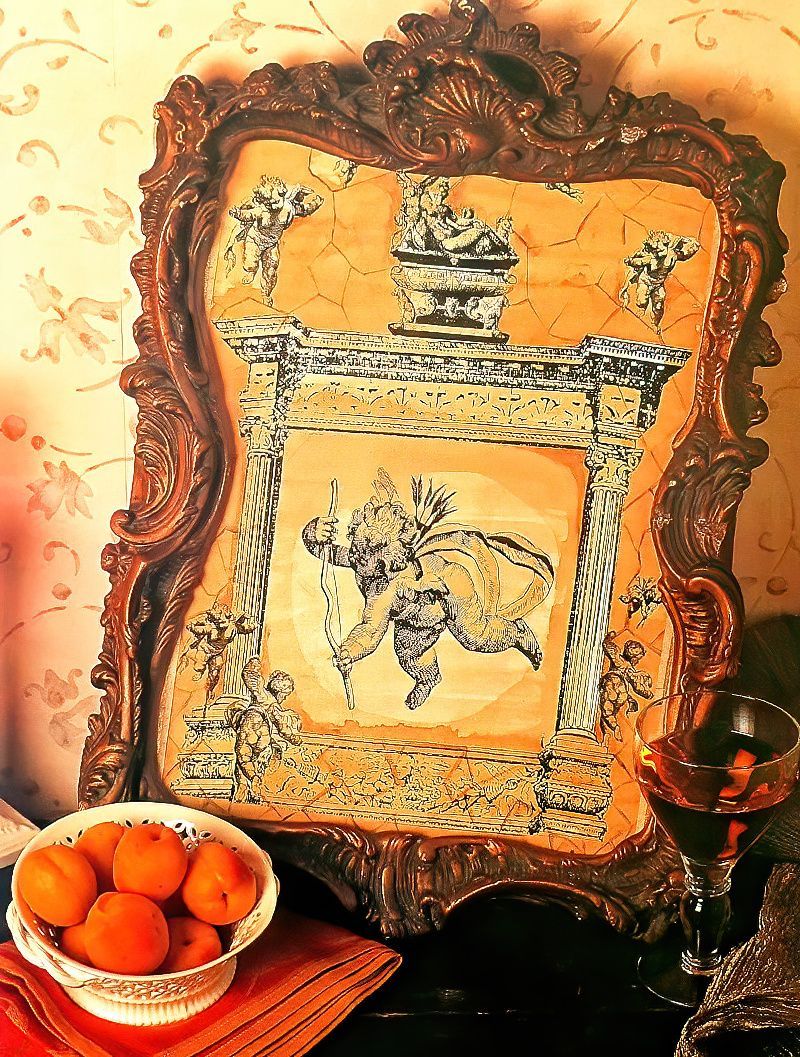
A Crackle Glaze Print Is An Interesting Effect
This is a very simple, but effective print technique if you like antique or vintage prints. And you want to get them for a fraction of the price. You can choose any black and white design that you wish to create your own piece. And you only need some basic craft materials, and a picture frame of your choice. Interesting picture frames can be found in charity shops.
Things You Will Need To Make A Crackle Glaze Print
Materials
- Selection of Black and White Printouts
- Spray Adhesive
- Cardboard
- Tea Bags
- Instant Coffee
- PVA Glue
- Large Piece of Cardboard or Hardboard
- Acrylic Medium
- Clear Acrylic Gloss Varnish
- Acrylic Paint in Burnt Umber
Equipment
- Scissors
- Large Soft Chinese Style Paint Brush
- Container for PVA Glue
- Decorators Paint Brush
- Fine Artists Paint Brush
- Container for Paint Mixing
How To Use Tea And Coffee To Age A Print
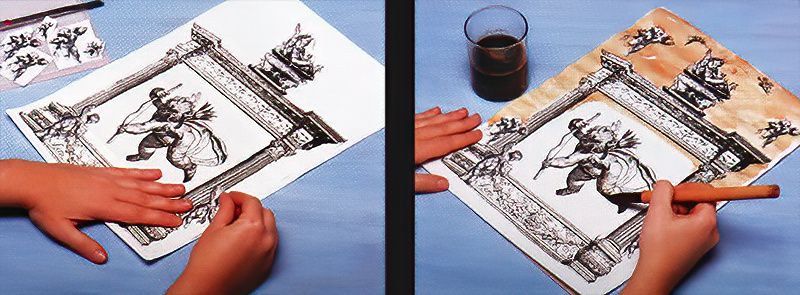
Step 1
Start by printing out or photocopying your black and white design, and then carefully cutting them out. Then lightly coat the back of the pictures with spray adhesive. Now, arrange all of your pieces on to cardboard until you are happy with the layout you have chosen. The spray adhesive lets you reposition them easily until it dries. Then once done, make a photocopy of your whole design.
Step 2
Next, make a mixture using one teabag and three teaspoons of coffee with water, and let it cool down. Use the Chinese style paint brush to apply the stain. Feel free to try different strengths of the mixture to experiment with colour until you are happy.
You can keep applying the stain to add layers of depth and ageing. Let the whole thing dry completely.
Mounting A Vintage Looking Crackle Glaze Print
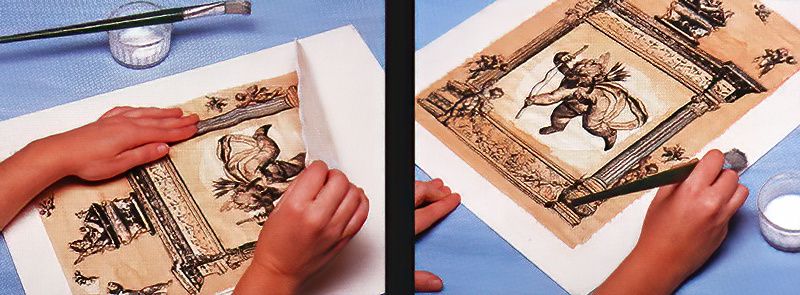
Step 3
Next, mix equal amounts of PVA glue and water, then apply it to the back of your print using the decorators paint brush. Then smooth the print out on the cardboard or hardboard to avoid bubbles in the picture. Brush the PVA glue and water mixture over the top of the picture on the cardboard and leave to dry for a while.
Step 4
Now, cover the print and the backing with acrylic medium which can cause some wrinkling. But once dry, the wrinkles should disappear, so don't panic.
Creating An Antiqued Crackle Glaze Print
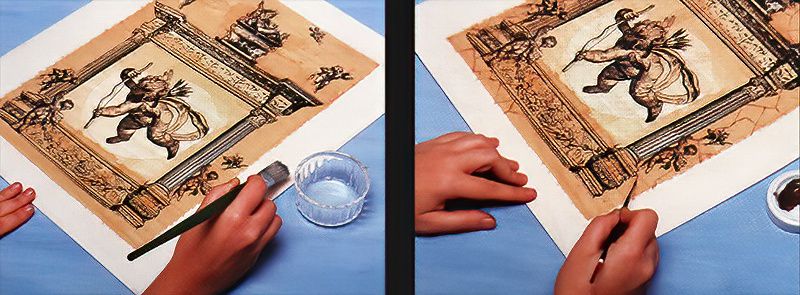
Step 5
Once dry, apply a coating of clear acrylic gloss varnish to the whole thing, which will give it both a bit of a shiny finish and an antiqued vintage look.
Step 6
Finally, mix the burnt umber coloured acrylic paint into some of the varnish and paint the cracks with a fine artists paint brush. You can add more shadowed areas and blend them softly. Then apply a final coating of varnish and leave the whole thing to dry completely.
Crackle Glaze Print Conclusion
Mount your crackle glaze print however you like. A clever effect that will impress anyone, I hope you agree. Give this craft project a go and share any successes you have.