Making A Handmade Gilded Patchwork Lampshade
A Gilded Patchwork Lampshade Adds A Touch Of Glamor
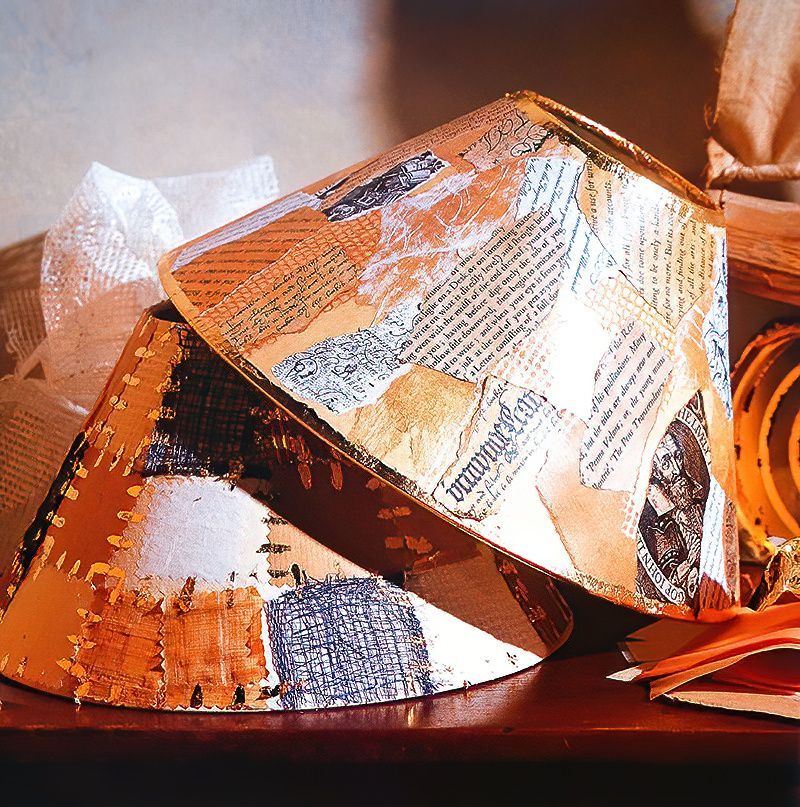
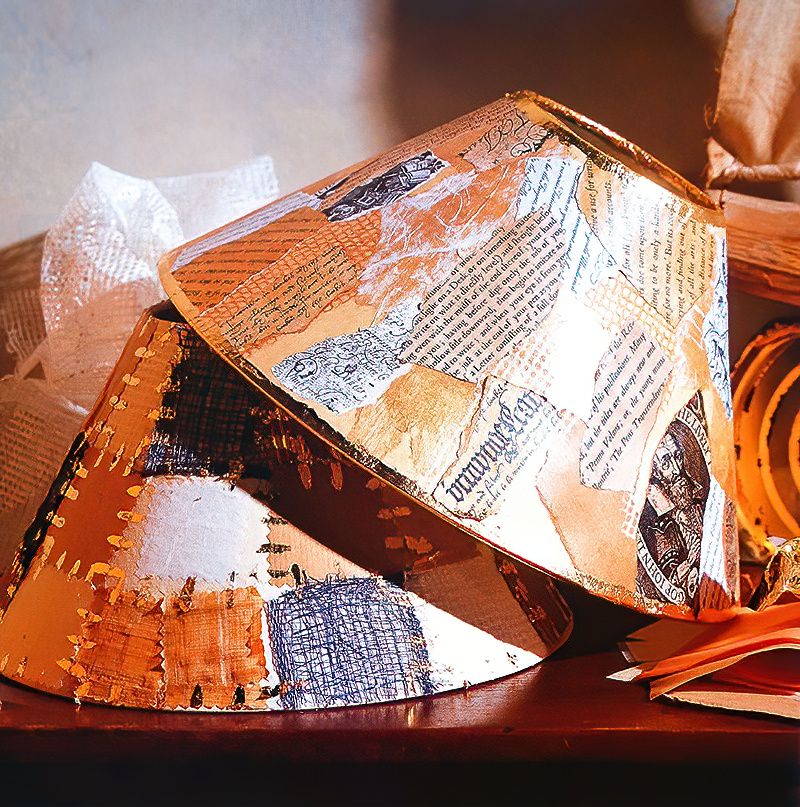
The beauty of making things yourself is being able to own something that is completely unique. No one else in the whole world has something exactly like you do. And this gilded patchwork lampshade is a fine example of that. There is a time and place for classic elegance. But I also think you have to have some bohemian fun also.
A fantastic project for children. A very practical solution to adding more interior design zing into a certain room. This gilded patchwork lampshade is a fun project and adds a lot of cool style.
We will make two gilded patchwork lampshades for a matching pair of lamps.
Things You Need To Make A Gilded Patchwork Lampshade
- 2 cream paper lampshades
- interesting pieces of paper, brown paper, ribbons or complimentary handmade papers
- torn patchwork papers, photocopies scripts, wrapping paper, homemade fibre paper
- wallpaper paste or PVA glue
- Dutch metal leaf
- gold size (this is the gold glue)
- denatured alcohol
- water based stain in a natural wood colour
- scissors
- various paintbrushes, small and medium
- firm bristle brush
- soft cloth

Start Making The Gilded Patchwork Lampshade
Step One
First we want to cut out squares of the different types of papers. We are going to make two lampshades. One will be more squares and regular and the other style will be more random.
Keep cutting out your squares and make them roughly similar sizes. Try and make them taper very slightly towards the top. This is obviously because the lampshade tapers towards the top. Don't be too worried about getting it precise. Just taper slightly. Eyeball it.
Step Two
Layout on your table a few variations and combinations of colours and layouts. Cut more colours and shapes if you need them. Once happy, apply a layer of wallpaper paste or PVA glue to each piece. Then stick them carefully in place on the lampshade.
Make sure they are tight up against each other to form a patchwork effect.

Our Gilded Patchwork Lampshade Is Taking Shape
Step Three
Now once the glue is all dry, we can get our gold "size" out. Gold "size" is the name used for the glue that sticks down gold leaf. I don't know why it is called gold size, but it's basically glue. Use an appropriately sized paintbrush to paint gold "size" lines like stitches. Paint these lines all around the patches.
We want the lines to be bold so we can see this detail from a little distance away. But again this is your gilded patchwork lampshade. If you feel you want to do it differently, then go ahead.
Step Four
Now DON'T wait for the gold "size" to dry. Now we need our Dutch metal leaf material. Cut the metal leaf into strips.
Gently press the gold leaf on to the tacky gold "size" stitches.

The Magic Of Gilded Patchwork Lampshades
Step Five
Now wait for everything to dry a little. Then we can use our bristle brush or similar to sort of brush away any excess gold leaf. This will leave an interesting gilded gold effect on our stitches. It looks amazing, don't you agree.
You can even use a soft cloth here to gently buff the gold leaf stitches on our gilded patchwork lampshade.
Step Six
For the other lampshade, we will use a torn paper patchwork effect. Collect more matching pieces of paper and carefully tear them into interesting shapes. Tear them into different sizes and shapes but not too wildly different.

Prepare More Papers For Our Lampshades
Step Seven
Now we have all our shapes, arrange them again until you have a design and layout you like. So now we can tint a few of the shapes with shellac. The shellac with make the papers translucent and slightly stiffer. Shellac around one third of your papers.
Use the denatured alcohol to clean your brush afterwards.
Now we can tiny another third of the papers using water based stain or acrylic paint that has been watered down. Finally let everything dry.
Step Eight
Now we can glue our papers to the other lampshade. Glue the shapes on, letting some overlap and others not. This lampshade is a more random effect.
Stick the shapes further apart at the beginning getting a good coverage all the way around. Then start to fill the gaps.
Use the tinted pieces first, finally filling the gaps with the untinted papers.

Completing Our Other Gilded Patchwork Lampshade
Step Nine
Now we need that gold "size" glue again. Paint about a 1cms or half an inch border line around the bottom and the top of the lampshade. Then cut the metal leaf into strips.
Step Ten
Once the gold "size" glue is tacky. Press the gold leaf into the strips we just painted. Go all around the top and the bottom of the lampshade.
Again, once dry, carefully brush off any excess. It goes everywhere so be careful. And polish up with a soft cloth.
The Gilded Patchwork Lampshade Project Completed
Congratulations, you have completed this wonderful project. The gold leaf really makes these lampshades sing and they definitely have a certain cool and interesting vibe. I would certainly like to have an interesting cocktail in a cosy jazz bar with these lampshades in there.







.jpg)
