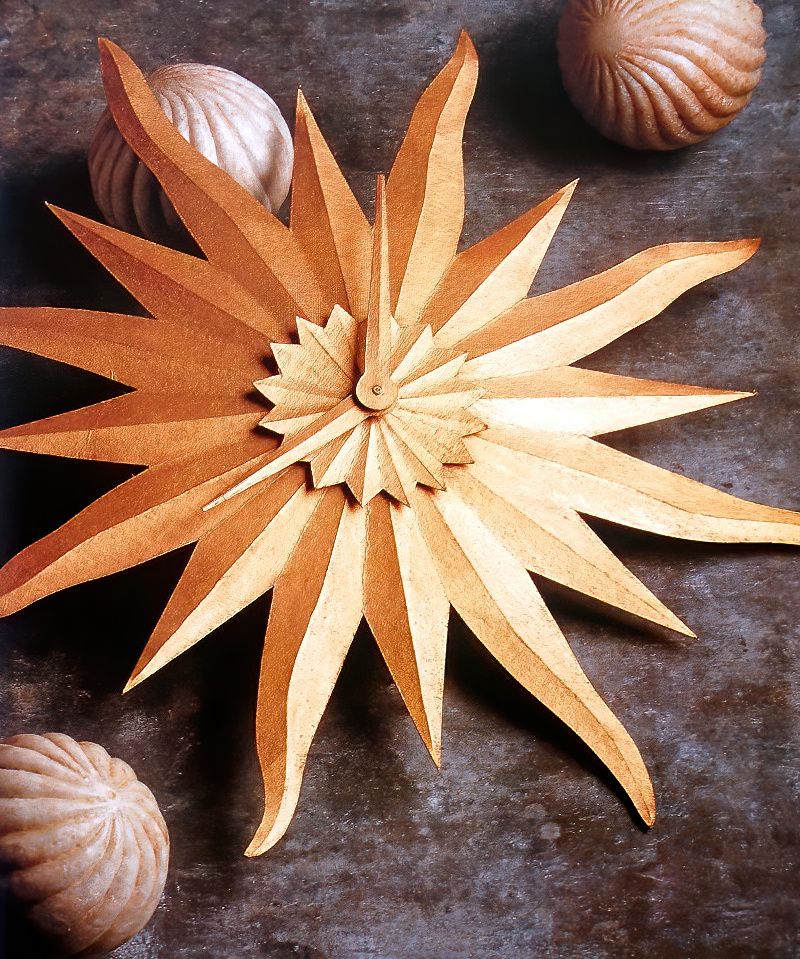
A Sunburst Wall Clock Is A Lovely Feature
I loved making this lovely clock for my daughters nursery (she has a sun, star and moon themed bedroom). I am so happy with how it turned out with only needing a few materials. The metallic finish really brings out the details in the sunburst design.
I think it is really interesting and not too overpowering that it would fit into anyone's interior decoration.
List Of Items Needed For A Sunburst Wall Clock
- Tracing Paper
- Thin Unlined Chipboard
- Water Based Paint in Deep Red
- Gilt Cream
- Clock Parts
- Pencil
- Craft Knife
- Cutting Mat
- Metal Ruler
- Paintbrush
- Soft Cloth
- Bradawl
- Glue
Making Your Sunburst Wall Clock Design
1st Step
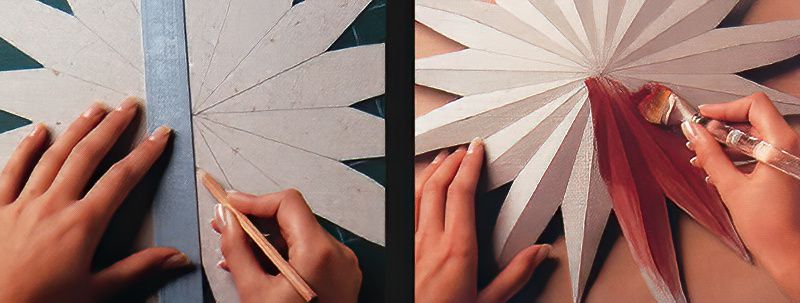
Find a picture to use as a template for your clock design, I have chosen a sunburst design. Then trace over your template, you can enlarge it to a bigger size if needed. Draw the main shape of the clock onto your piece of chipboard. Carefully cut out the inner shape and the two clock hands, using a craft knife, metal ruler and a cutting mat. You will not need the ruler for any curved parts, so carefully cut those freehand.
2nd Step
Next, score along all of your pencil lines on the front of what will be the clock face with a craft knife. Be careful to ensure that you do not cut all the way through. Then repeat the process on the inner piece for the clock design. I have used a smaller zig zag edged circle for mine.
Shaping Your Clock Design
3rd Step
Now, turn the piece of chipboard over, and draw the pencil lines on the back of the clock, and score again as before, and not cutting all the way through. Do the same process with the smaller inner piece.
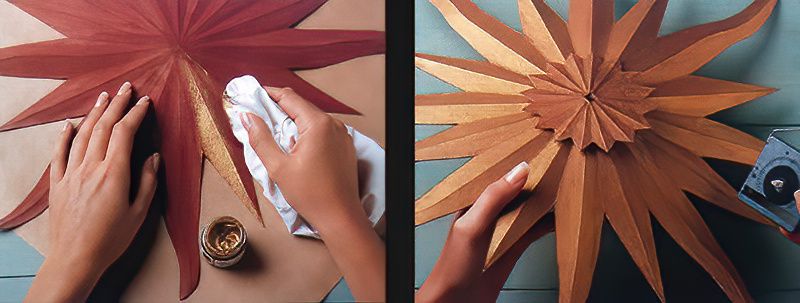
4th Step
Next, gently fold along all of the score lines that you have made, ensuring that the chipboard does not crease. You will need to concertina all of the fold lines together to make all of the folds for the clock. Repeat the same technique for the inner piece. Then, paint all of the pieces with the red paint, and leave to dry thoroughly.
Painting Your Sunburst Wall Clock
5th Step
Once the paint has dried, use a soft cloth to rub the gold gilt cream over the whole thing. You can do this evenly or unevenly if you would like a little of the red paint colour to show through a bit. Then again leave it to dry.
6th Step
Lastly, using a bradawl, cut holes into the centre of both pieces of the clock and push through the clock mechanism (you can buy clock mechanisms from a craft shop like Hobbycraft). Screw it on securely. Then stick the chipboard hands onto the plastic ones and fix them to the clock and mechanism.
Congratulations, you have completed your sunburst wall clock. Now I'm sure it's time for a nice cup of tea.


.jpg)


.jpg)