Decorative Papier Mache Drawer Knobs
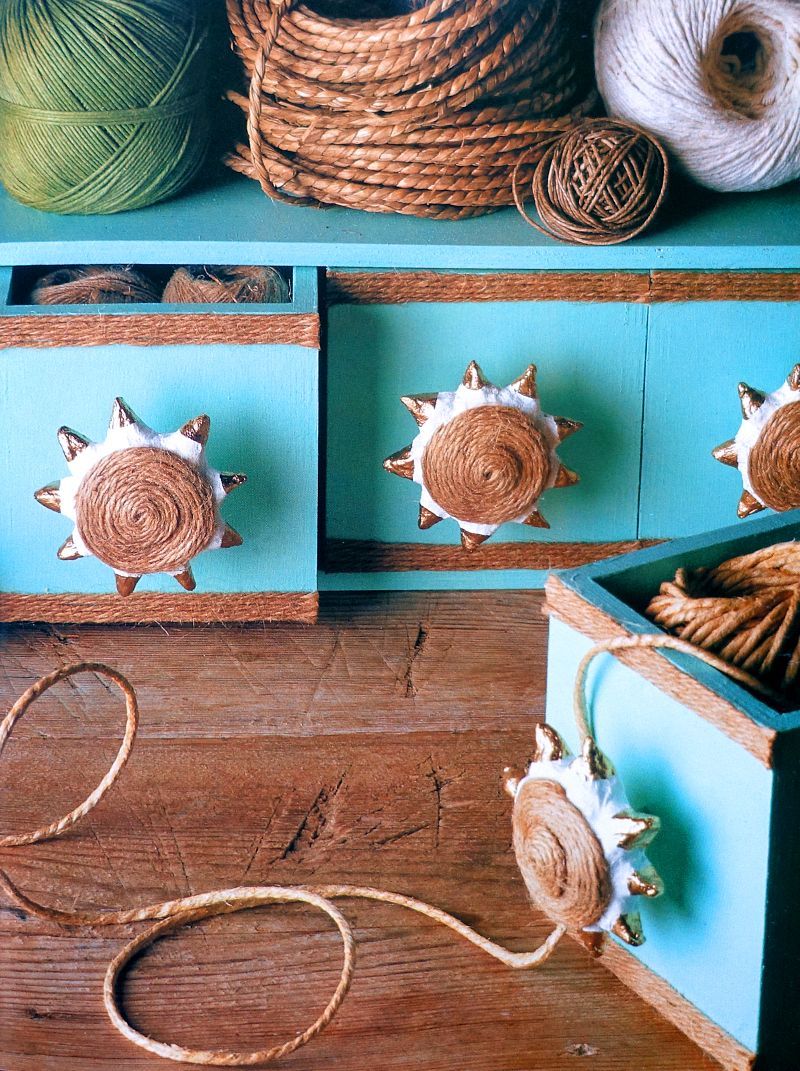
Are you are looking to create some unique decorative handmade pieces to accessorise your home? Try these star shaped decorative papier mache drawer knobs. They can really elevate a simple piece of furniture, like a chest of drawers.
Obviously you can make them in any shape or design that you wish, I have chosen this star shape for mine. These decorative drawer knobs are made entirely from tissue paper pulp / papier mache, and are very strong when completely dry.
A screw attaches them to the drawers, or other furniture that uses handles. Then they are finished with some simple household / gardening string. And a little bit of gold is added to make the perfect metallic finishing touch.
Now my daughters would really like to have a go at making some. They really want their bedrooms decorating, so this would be a nice personal finishing touch for them and a good way to involve them. It can be messy work making papier mache drawer knobs, but the result is most definitely worth it.
To Make Papier Mache Drawer Knobs You Will Need
Materials
- Tissue Paper
- PVA Glue
- Newspaper
- White Emulsion Paint
- Rough Household / Gardening String
- Gold Acrylic Paint
Equipment
- Container for PVA Glue
- Wire Rack
- Scrap Piece of Wood
- Bradawl
- Pencil
- 50mm X 3mm Machine Screws and Nuts (One for Each Knob)
- Fine Grade Sandpaper
- Medium Artists Paint Brush
- Scissors
- Clamp
- Hand Drill
Getting Started With The Messy Papier Mache Bit
Step 1
First, loosely scrunch up a sheet of tissue paper into a ball and dip it into the PVA glue that is slightly diluted until the ball is completely saturated with the mixture.
Step 2
Now squeeze out the excess glue from the ball of tissue paper, and work it around between your hands until it breaks down and becomes a pulpy consistency.
Still On The Messy Part
Step 3
To create each knob, hold the ball of saturated tissue paper between your thumbs and fingers, and flatten it into more of a disc shape. Ensure that you press it between your fingers until it becomes completely smooth.
Then put the disc on a wire drying rack to dry slightly. Repeat this process with however many star shaped papier mache drawer knobs that you would like to make.
Step 4
Next, tear small pieces of tissue paper off and dip them into the diluted PVA glue mixture. Then squeeze and roll them between your thumb and finger to create small pointed cone like shapes.
Press these pieces firmly onto the sides of the disc, all the way around and leave them to dry thoroughly. These points will form the star shape of the knobs. However, you can choose any shape you like.
More Messy Papier Mache
Step 5
Now, cover the knobs in one layer of papier mache strips and again leave to dry. Once dry, place them on a scrap piece of wood and use the bradawl tool to form a hole in the centre of each decorative drawer knob. Then use a pencil to widen each hole until it is the right size to place a machine screw into.
Step 6
Next, you need to insert a screw into the centre of each of the knobs and secure it into position with a matching size nut. Then cover the head of each of the screws in two layers of papier mache strips to hide the screws. Leave this to dry thoroughly.
Decorating Our Papier Mache Drawer Knobs Is The Best Part
Step 7
Now to lightly sand each of the decorative knobs, and prime them all with two coats of the emulsion paint. Ensure that you allow the first coat to dry thoroughly before applying the second coat of paint.
Step 8
Next spread a small amount of the diluted PVA glue in the centre of each of the knobs, and coil a piece of string onto the middle of it to create a decorative centre.
Embellishing And Personalising The Papier Mache Drawer Knobs
Step 9
Finally paint each of the star knob tips in the gold acrylic paint. Then now that you are almost done. If it is a new drawer with no hole, clamp the drawer as firmly as you can and drill a hole where you would like to place the drawer knobs.
Now place a nut onto the machine screw and push the screw through the hole. Then wind on another nut to hold the knob in place. Repeat this process for the other knobs and ensure that they are all well tightened.






.jpg)

.jpg)

