Coffee Pot Cozy: A Girly, Floral, and Cupcake-Inspired DIY
A quilted coffee pot cozy is more than just a practical accessory; it's a delightful embodiment of warmth and style for your morning coffee routine. Crafted with care and creativity, this cozy combines the comfort of quilted fabric with charming design elements. Whether you prefer bold, vibrant patterns or soft, soothing hues, there's a cozy to match your personal taste.
Beyond its aesthetic appeal, a quilted coffee pot cozy serves a functional purpose, keeping your coffee piping hot and ready to pour, all while adding a touch of cozy elegance to your kitchen or dining space. It's a small yet significant addition that elevates your daily coffee ritual, making each sip feel like a comforting embrace.
This charming coffee pot cozy is the perfect companion for those delightful mornings filled with frothy coffee and scrumptious cupcakes. Drawing inspiration from the cozy ambiance of nostalgic country cafés, this project combines sweet floral fabrics, white cotton trimming, frills, and flounces to create a truly enchanting coffee pot accessory. And don't forget the pièce de résistance a mouthwateringly cute cupcake appliqué!
Materials You Need To Make A Quilted Coffee Pot Cozy
- 6 x 6in. (15 x 15cm) piece of white cotton fabric
- Scraps of patterned fabric in pink
- 3 x 3in. (7.5 x 7.5cm) piece of green fabric
- 6 x 6in. (15 x 15cm) piece of Bondaweb
- Coordinating pearl embroidery floss
- Coordinating beads and sequins
- Embroidery hoop
- 5 x 7in. (12.5 x 17.5cm) each of four floral fabrics
- 10in. (25cm) of white broderie anglaise trimming
- 15 x 6in. (37.5 x 15cm) piece of patterned cotton
- 14 x 5in. (35 x 12.5cm) piece of cotton batting (wadding)
- 6 12 x 9 1/2in. (16.5 x 24cm) piece of pink dotted fabric
- 14in. (35cm) of white braid trimming
- Eyelet punch
- 66in. (165cm) of narrow ribbon
How To Start Making A Quilted Coffee Pot Cozy
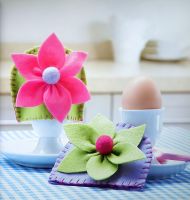
Step One: Create the Cupcake Appliqué
Refer to the appliqué instructions to craft a pink and green cupcake appliqué on white cotton fabric. Add intricate details like embroidery, beading, and sequins, using the accompanying photograph as your reference. Trim the cupcake appliqué down to a size of 4 3/4 x 5 1/4 inches (12 x 13 cm).
Assemble The Patchwork Quilted Coffee Pot Cozy
Step Two: Assemble the Patchwork Front
Utilize the triangle template to cut out two triangular patches from each of the four distinct floral fabrics. Seam together one set of triangles, maintaining a 1/4-inch (5mm) seam allowance, to form a delightful patchwork square featuring a mix of floral patterns. Repeat this step to create another square.
Continue Making The Quilted Coffee Pot Cozy
Step Three: Incorporate Trim and Attach Patchwork
Align the raw edges and baste (tack) white broderie anglaise trimming on each side of the cupcake piece to secure it for stitching into the seam. Pin one patchwork square to either side of the cupcake appliqué piece, ensuring the right sides are facing each other. Machine stitch all the pieces together and remove the basting (tacking).
A Coffee Pot Cozy Keeps Your Brew Hot
Step Four: Prepare the Back and Batting
Cut a piece of patterned fabric measuring 14 x 6 inches (35 x 15 cm) for the back of the cozy. Cut a piece of batting (wadding) measuring 12 1/2 x 4 3/4 inches (32 x 12 cm). Layer the batting between the patchwork front and the back, ensuring that the right sides are facing outward. Pin everything in place. Quilt the coffee pot cozy by stitching along all the seam lines of the patchwork.
Add Some Details To Your Quilted Coffee Pot Cozy
Step Five: Create the Flounce (Frill) and Binding
Fashion a flounce (frill) by cutting a spiral strip of fabric, approximately 12-inch (12mm) wide and 28 inches (70cm) long, from the pink spotted fabric. Cut the spiral strip in half to yield two flounce (frill) lengths. From the same pink spotted fabric, cut two binding strips measuring 14 x 1 1/2 inches (35 x 4 cm) and two measuring 6 1/2 x 1 1/2 inches (16.5 x 4 cm). Turn under 1/4 inch (5mm) along both long edges of all four binding strips.
Finish Making Our Quilted Coffee Pot Cozy
Step Six: Bind and Embellish
Use the two longer binding strips to bind the top and bottom edges of the cozy. Machine stitch the two lengths of flounce (frill) along the bottom of the front of the cozy. Pin and then machine stitch a length of white braid trimming to conceal the stitching and the top edges of the flounce. Employ the shorter binding strips to bind the side edges, ensuring that the ends of the flounce are secured within the binding on each side.
Nearly Finished Making Coffee Warming Decoration
Step Seven: Add Ribbon Ties
Utilize an eyelet punch to create circular holes at the top and bottom of each side of the cozy, just inside the binding. Cut the ribbon into four equal pieces and thread one through each hole, knotting it in place to ensure a secure fit. Wrap the cozy around your coffee pot and tie the ribbons to keep the cozy snugly in place.
With these detailed instructions, you'll have a quilted coffee pot cozy that not only keeps your brew warm but also adds a touch of charm and whimsy to your coffee and cupcake mornings. Enjoy your crafting journey!
Leave A Comment
We hope you have enjoyed following our quilted coffee pot cozy tutorial. Please leave a comment down below and let us know how you got on.